Stop dreaming about a stunning yard. These practical, low-cost garden landscaping ideas transform your outdoor space without breaking the bank.
- June 29, 2026
AceShowbiz - Last spring, I stood in my backyard, coffee in hand, staring at a patch of dirt that had somehow become the official graveyard for broken flower pots and a rogue soccer ball. My neighbor's garden looked like it belonged in a magazine—lush borders, a winding stone path, and a water feature that gently gurgled. I assumed she had a secret landscaping budget the size of a small car. Then she told me the truth: she spent less than $400 over two weekends.
That conversation changed how I think about outdoor spaces. Landscaping doesn't require a six-figure renovation or a team of professionals. With some strategic planning, a willingness to get your hands dirty, and a few smart shortcuts, you can create a garden that feels expensive without the price tag. Here is the honest, practical breakdown of how to do it.
Start with a Hardscape Foundation That Costs Pennies
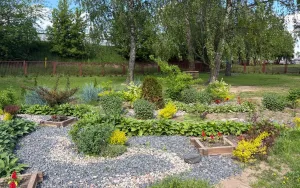
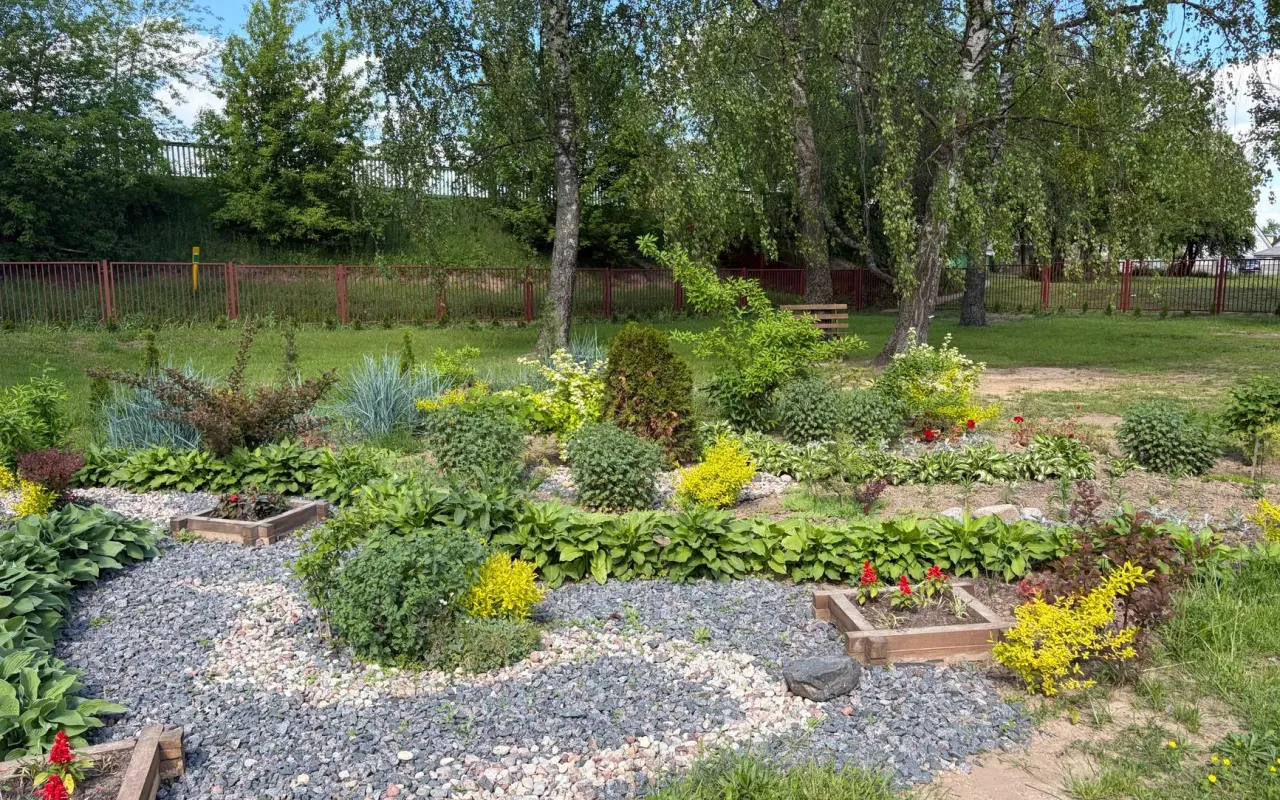
When people hear "hardscape," they picture poured concrete patios and retaining walls built by crews in matching vests. But the most impactful hardscape elements are often the simplest—and cheapest. Think gravel paths, reclaimed brick borders, or even a simple decomposed granite circle for a seating area. These materials cost a fraction of what pavers or stamped concrete run, and they install in hours, not days.
For example, a 4x6-foot gravel patio area requires about 10 bags of pea gravel at roughly $5 each, plus a roll of landscape fabric for $15. That is a total of $65 for a functional, attractive space that instantly defines your yard. The "so what?" here is that hardscape creates structure. Without it, your garden looks like a messy collection of plants. With it, you get instant visual order—and you can build the rest of your design around that anchor.
Where to Find Free or Cheap Materials
Check local classifieds, Facebook Marketplace, or neighborhood "buy nothing" groups. People regularly give away leftover bricks, flagstone remnants, or even entire pallets of stone after their own projects. I once picked up 40 square feet of flagstone for free from a family who just wanted it gone. The only cost was loading it into my truck and a $10 pizza as a thank you.
Another trick: visit a local landscaping supply yard and ask about "irregulars" or "seconds." These are stones or bricks with minor chips or discoloration that sell at a steep discount—often 50% off or more. For a budget garden, those imperfections add character, not flaws.
Choose Plants That Multiply Themselves (Seriously)
One of the biggest mistakes new gardeners make is buying a flat of annuals every spring. That is an expensive habit. Instead, focus on perennials that spread naturally—plants like hostas, daylilies, sedum, and ornamental grasses. A single $10 plant can become ten plants within two years if you divide it properly. That is a 900% return on investment, and it requires nothing more than a shovel and a little patience.
I watched a friend transform her entire front border using just five $8 lavender plants and two $12 Russian sage shrubs. Within three growing seasons, she had divided the lavender into 20 plants and the sage had self-seeded across the bed. Her total cost: $64. The same border at a nursery would have run over $300. The "so what?" is that your garden can grow richer every year without spending more money. You just have to choose the right plants from the start.
How to Divide Plants Like a Pro
Wait until early spring or fall when the plant is dormant. Dig up the entire clump, then use a sharp spade to slice it into sections—each with at least three healthy shoots and a good root system. Replant immediately and water thoroughly. Most perennials actually benefit from division every 3-4 years because it prevents overcrowding and stimulates new growth. So you are not just saving money; you are improving your garden's health.
Also, swap plants with neighbors. I have a running trade with three people on my street: I give them extra hosta divisions, they give me black-eyed Susans or bee balm. It costs nothing and builds community. Plus, you get a more diverse garden without spending a dime.
Use Mulch as Your Secret Weapon (But Not the Expensive Kind)
Mulch is the single cheapest way to make a garden look polished. A fresh layer of dark brown or black mulch instantly defines beds, suppresses weeds, and retains moisture. But buying bagged mulch from the big-box store is a trap—it costs $3-$5 per bag, and you need dozens of bags for even a small yard. That can easily run $100 or more.
The budget alternative: order bulk mulch from a local landscape supply company. A cubic yard of shredded hardwood mulch typically costs $25-$40 and covers about 100 square feet at 3 inches deep. That is roughly the same coverage as 13 bags of bagged mulch, which would cost $40-$65. The savings are real, and the quality is often better because it is fresher and not dried out from sitting on a pallet.
Free Mulch Options You Haven't Considered
Check with local tree removal services. They often have massive piles of wood chips they are desperate to get rid of—for free. You just have to haul them yourself. The chips are usually a mix of branches and leaves, which break down into rich compost over time. Yes, it is not as uniform as dyed mulch, but it works beautifully for paths, play areas, or under trees where aesthetics matter less.
Another free option: leaves. Rake your fall leaves into garden beds as a natural mulch. They decompose over winter, feeding the soil and protecting plant roots from frost. Come spring, you just turn them into the soil. That is zero cost and zero waste.
Build a Focal Point from Salvaged Items
A garden without a focal point feels flat. But you do not need a $2,000 fountain or a custom pergola. A focal point can be anything that draws the eye—a brightly painted bench, a vertical trellis made from reclaimed wood, or even a cluster of large pots arranged at different heights. The key is contrast. Something that stands out against the greenery creates visual interest and makes the whole space feel designed.
I built a trellis for my climbing roses using three 8-foot cedar fence pickets ($4 each) and a roll of galvanized wire ($8). Total cost: $20. It took 30 minutes to assemble with a drill and a staple gun. That trellis now anchors the entire back corner of my garden and gets compliments every summer. The "so what?" is that a single, intentional element can transform a plain yard into a space that feels curated. You just need one thing that says, "I thought about this."
Where to Find Salvaged Garden Art
Estate sales, garage sales, and flea markets are goldmines. Old metal chairs, vintage watering cans, even a rusted wheelbarrow can become planters or decorative accents. I once found a set of three wrought-iron plant stands for $10 at a garage sale. Spray-painted matte black, they looked like they cost $150 from a boutique. The trick is to look past the current condition and see the potential. A little paint, a little cleaning, and you have a unique piece that no one else has.
Also, check construction sites for discarded materials. Old pallets can become vertical planters. Scrap lumber can edge beds. Broken concrete chunks (called "urbanite") can stack into a retaining wall or border. All of it is free if you ask permission first.
Lighting on a Shoestring: Solar Isn't Always the Answer
Garden lighting instantly extends your outdoor living space into the evening, but the cost can spiral fast. Low-voltage landscape lighting systems start around $200 and require trenching and wiring. Solar lights seem like the obvious budget solution, but cheap solar lights are notorious for dimming after a season or two. The batteries die, the plastic cracks, and you end up replacing them every year—which is wasteful and not actually cheaper in the long run.
A better budget strategy: use a mix of inexpensive string lights and a few strategic solar path lights that you buy from a reputable brand. String lights cost $15-$30 for a 50-foot set and plug into a standard outdoor outlet. Drape them over a fence, along a pergola, or through a tree branch. They create instant ambiance for pennies per hour of operation. For path lighting, spend a little more on solar lights with replaceable batteries (like those from LITOM or Aootek). They last 3-5 years and cost about $25 for a 12-pack.
DIY Lighting Tricks That Look Professional
Wrap string lights around a bamboo stake or a fallen branch to create a freestanding light "tree." Place it in a large pot filled with sand for stability. That costs under $10 and looks like a custom light sculpture. Another trick: use mason jars as lanterns. Hang them from shepherd's hooks with a tea light inside. You can buy jars in bulk for $1 each at craft stores, and the hooks are $3 each at a hardware store. That is $4 per light fixture—far cheaper than anything from a garden center.
The "so what?" is that lighting makes your garden feel like a room, not just a yard. And you do not need an electrician to achieve it. Focus on one or two areas—like a seating spot or a path—and light those intentionally. The rest can stay dark. That creates drama and saves money.
Maintenance Is the Real Budget Killer (Here's How to Beat It)
Most people think the cost of landscaping is the initial setup. But the hidden cost is maintenance—watering, weeding, pruning, replacing dead plants. A garden that requires constant upkeep will drain your wallet and your time. The budget-friendly approach is to design for low maintenance from day one.
Group plants with similar water needs together (this is called "hydrozoning"). That way, you are not watering a thirsty fern next to a drought-tolerant succulent. Install a simple drip irrigation system on a timer. A basic kit costs $40 and attaches to your outdoor spigot. It waters deeply and slowly, which reduces water waste by up to 50% compared to a sprinkler. That saves you money on your water bill and keeps plants healthier.
The 80/20 Rule for Weeds
Eighty percent of weeds come from twenty percent of your garden—usually the edges and bare soil. Lay down a thick layer of cardboard (flattened boxes) under your mulch. It smothers weeds, decomposes slowly, and costs nothing. Top it with 3 inches of mulch, and you will pull weeds maybe twice a season instead of every weekend. That is time and money saved.
Also, choose plants that are native to your region. They require less water, fewer fertilizers, and are more resistant to local pests. That means fewer trips to the garden center for treatments and replacements. Native plants are not just eco-friendly; they are wallet-friendly.
Putting It All Together: Your 4-Week Budget Plan
Here is a realistic timeline that works for a 500-square-foot yard. Week one: clear the space and lay down a hardscape anchor (gravel patio or path). Cost: $65. Week two: build your focal point (trellis, bench, or large pot arrangement). Cost: $20-$50. Week three: plant perennials from divisions, swaps, or bare-root orders (cheapest option). Cost: $30-$60. Week four: mulch everything and add string lights. Cost: $40 for bulk mulch plus $20 for lights. Total: $155-$195. That is less than a single consultation fee from a professional landscaper.
The beauty of this approach is that you can stop at any point. Even just the hardscape and mulch will make your yard look 10 times better. The plants and lighting are bonuses that compound over time. And next year, you will have free plants to divide, a stronger foundation, and the confidence to tackle bigger projects.
Your garden does not have to be perfect. It just has to be yours—and it can start with a pile of gravel, a handful of plants, and a willingness to try something new. That is the real secret to budget landscaping. It is not about cutting corners. It is about spending your time and money on the things that actually matter.